Working with waxed canvas
Share
Over the two-week Winter break, I decided to finally try something I've meant to try for a long time now - waxing canvas. In Canada, it is nearly impossible to find waxed canvas for sale. You usually need to buy it from the U.S. and pay for shipping and quite possibly (almost certainly), custom fees.
Instead, I decided to try waxing my own canvas. I started by reading a lot of online material regarding waxing - tutorials, discussion groups, etc. I found quite a variety of information about different types of waxes, different application methods... it was overwhelming! I viewed some Youtube videos that showed different techniques for applying wax and then came up with a plan.
Step 1: FIND CANVAS
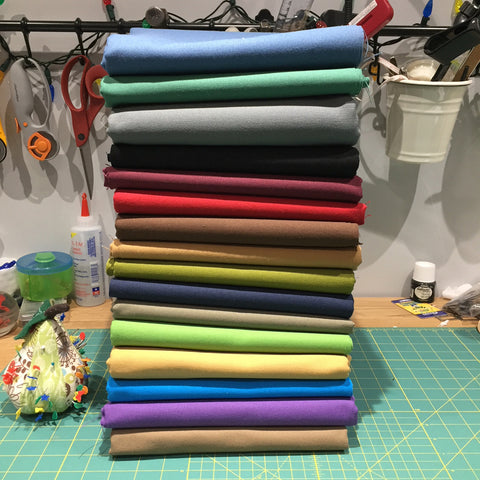
I was unable to find a good 10 ounce cotton canvas in a variety of colours in Canada. I searched for the best prices from U.S. manufacturers with the most cost-effective shipping being a priority. I had ordered from Big Duck Canvas in the past so I had a look at their website again. Now, please note that they do sell pre-waxed canvas HOWEVER, it is expensive and does not come in very many colours. I wanted PRETTY colours! I ordered 16 colours (1 yard cuts) of their 10 oz. cotton duck. They ship via UPS and they have a set brokerage fee so ordering large quantities is worth it. Total cost per yard, including shipping and brokerage fee: just under $16 CAD. Here is my beautiful canvas collection, before waxing. (do not judge my messy work bench!)
Step 2: FIND WAX
Since I would need quite a bit of wax for this much canvas, I searched for wax sold in bulk. Much to my surprise, it is very easy to find wax but I went a step further and shopped around for the best prices. I googled "Bulk candle making supplies" and found that Village Craft and Candle had some of the best prices and a huge variety of wax. Based on my research, I had decided to make a mixture of beeswax and paraffin wax. Using only one of these is not ideal, it is best to use a mixture of both. Beeswax is too brittle and paraffin doesn't smell all that great.
Products like Otterwax are very good - they only use beeswax and a secret combination of plant-based waxes and oils. However, you can only purchase small bars and that can get very expensive for large quantities of canvas. Since I don't know the secret Otterwax recipe, I decided to go for what I could find locally.
I purchased the natural, yellow beeswax and I used the 4630 container paraffin wax (this is a very soft and creamy wax that melts quickly).
(I also read that using a combination of beeswax, paraffin wax, linseed oil and turpentine is very good. However, I did NOT want flammable ingredients in my wax so I did not include them. Plus they smell terrible and I am waxing in my studio.)
You would need roughly 12 oz of wax total for 1 yard of canvas. I use 2/3 paraffin and 1/3 beeswax (8 oz paraffin, 4 oz beeswax). You could probably use more paraffin and slightly less beeswax and still achieve a nice smelling waxed canvas.
Step 3: TOOLS
You will need the following supplies:

- an old iron. Do not use your good iron. It will become covered in wax. Get an old second-hand iron or buy a cheap model for $20 on Amazon like I did.
- a slow cooker (crock pot) to melt your wax. Again, don't use your nice slow cooker. Find a cheap one second-hand or be lazy like me and buy one for $20 on Amazon. It does not need to be very big.
- a bristle paint brush. Get a nice wide one.
- old towels
- a table/surface to work on and something to protect it from the heat of the iron. I used a folding card table since I didn't want to use my nice work bench. I covered it with 2 layers of cardboard.
Step 4: APPLYING THE WAX
I've prepared a short video on the waxing process:
When you've applied your wax, you will need to let your canvas cure for 24-48 hours. I have one of those lightweight clothing racks that are perfect for the task!

Once your canvas has had a chance to cure, it's best to store it on rolls if you can. I don't have room for any more rolls (I have an enormous collection of cork and vinyl) so I've just folded mine and stored them on a shelf. If I want to remove the creases from the folds, I use a pressing cloth and iron them out. They come out very easily!
Step 5: SEWING WITH WAXED CANVAS
There are many wonderful blog posts with helpful tips for working with canvas. I asked my friend Betz if I could link to her blog post and she graciously agreed.
Betz White - Sewing with waxed canvas
I whipped up a quick tote with my new waxed canvas and I'm very pleased with the result!


19 comments
Hey…
If you have a company, you require to make business an unique brand name in this modern-day period of globalization.
Influencer advertising and marketing is a type of social networks advertising which involves endorsements and also product placements from influencers, individuals and organizations.
The Influencer Agency is a worldwide platform to help you discovering the appropriate course to establish a much more one-of-a-kind brand to broaden your business via influencer advertising.
You simply require to take a little action and we will attach you with the best people at correct time.
There has actually been a substantial modification in globe business market after the age of influencer advertising began.
Since it really develops the excellent partnership in between the brand as well as the customer with social marketing.
The Agency supplies you to enjoy the growth of your organisation by getting in touch with Instagram influencers, as well as durable clients.
Discover more: https://tile.4brands.xyz/ecsenave
Sent out from my Verizon, Samsung Galaxy mobile phone
In case you are not curious, then I ask forgiveness as well as thanks for reading.
bear in mind.
To Unsubscribe link: https://tile.4brands.xyz/un/6CgD
#%rnd_phone%2763-
Joyce Osborne – it does and the waxed canvas develops an aged look but should be durable depending on the weight you’ve used.
Laurie Levites – no I do not pre-wash
Patsy Spencer – I used a high temp and no steam. Steam will actually leave water marks. I used a container melt/pour type of paraffin.
Liz Hanes – I don’t know much about candelilla wax
Excellent video! I never thought of doing this in the house… I like it. I have done this in the summer. What I do is melt the wax in an old roaster or large pot and I put the whole piece of canvas in the pan and let it sit really soak it good. I have a large piece of plywood leaning against my clothes line (plastic drop cloth under) clips on the top of plywood that I clip the canvas to. Then I take another piece of wood (2×4) and squeegee the excess off. I tape clear packaging tape over my clothesline to protect it from the wax and hang the waxed canvas and let it kind of bake and dry in the sun. It probably sounds complicated and really time consuming but it actually is pretty quick. Just another idea for summer time fun and crafting :-) Thanks again for the video and tips.
Does waxed canvas hold up very well on a bag that is use daily
Beautiful and great info. Did you prewash your canvas before waxing?